This is a solitaire replay of the Solomon Sea Coral Sea scenario, played as a starter for Campaign Sequence 1, The South Pacific Campaign, and played with the Solomon Sea solitaire rules. When looking at the photos, note that the solitaire rules mean that both side's forces are placed on the same map, so the counter density is quite a bit higher than for normal double blind or refereed play. Also, note that the game was played using a playtest copy, so some things look a bit different from the published game.)
A note on the solitaire rules: Yes, with these rules Solomon Sea becomes solitairable. It's of course no longer really double blind but when playing solitaire some things have to be accepted. The solitaire rules replace the fog of war of the double blind game by restrictions that still make the task forces behave in a historical manner. Effectively, they limit task forces to actions that would be possible based on the commander's knowledge of the situation, not the player's. Please do not ask for the rules, as I am not distributing them at the moment, but they will be made available in some form in the future and this will be appropriately announced. I am not posting this replay specifically to drum up interest in the solitaire rules but simply because I like writing and posting replays and this was one I had available. :-)The solitaire rules include a command control system. The leadership characteristics (main characteristic in the game when playing with the solitaire command control restrictions) are "normal" for the Japanese, and "Fletcher" for the US. The Alternate setup tables are not used.
0100 May 4, 1942
Not much happens initially; Fletcher, as historically, positions Yorktown for a strike against Tulagi (it's too good a target not to go for, if one runs away quickly enough afterwards).
0430: All sides' carriers are compelled to move one hex towards their goal markers except Shoho (she is already adjacent). The air searches begin, and the Japanese launch another long range search, the Mavis unit from Shortlands. Fletcher launches a SBD search of the area north of Tulagi that just narrowly manages to find the retreating Japanese ships (DR 4). The PBY out of Noumea, the B-17 out of Townsville, and the Mavis out of Rabaul all miss their search communications rolls. The Mavis out of Shortlands and the Hudson out of Port Moresby succeed in their roll, but each fails to find the other side's carriers due to the bad weather (DR 3). The Hudson sights the Japanese oiler north of Choiseul (which would provide a trigger for the US side to change its goal markers if desired). Truly not a particularly inspiring start for the land-based forces.
Both sides exchange morning raids. The Japanese predictably hit Port Moresby, the Allies hit Lae. Also, Yorktown launches an air attack on the ships north of Tulagi. At Port Moresby, the 27 Allied fighers gain the initiative and dive past the surprised Japanese fighters to attack the bombers. 21 Bettys are damaged or shot down. But then the Zeroes catch up with the P-39s and the revenge is quick. One step survives undamaged, shooting down several Zeroes. An unusually bloody air battle, but the Japanese bombardment scores no hits on the airfield (A 4/J 5 [4/5]).
The Allied attack at Gasmata likewise surprises the CAP, but half the weak escort is shredded by the Zeroes on the rebound. 9 B-25 are damaged or downed. AA fire hits SBDs and Marauders. One disappointing hit is scored on the airfield, but the damage is quickly repaired. (A 1/J 5 [5/10])
The attack on Tulagi sees very weak AA fire that nevertheless claims some SBD's. The transports are sunk without difficulties, some planes also attack the destroyers but score no hits. (A 4/J 1 [9/11])
After the attack, Fletcher resets Yorktown's TF 17 goal marker to N10, coinciding with Lexington's. The Japanese Carrier force resets its marker to N7.
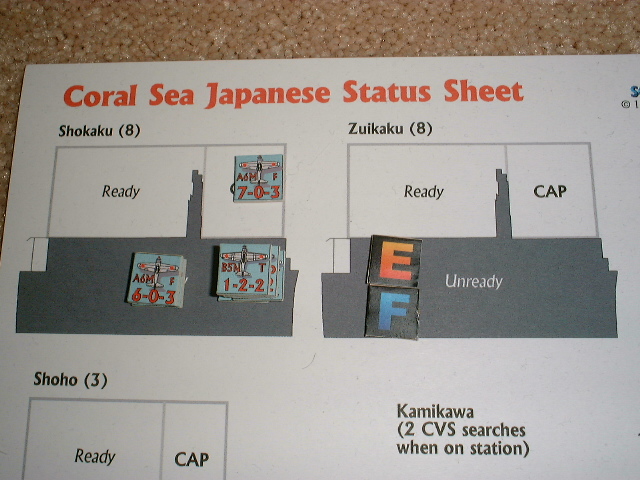
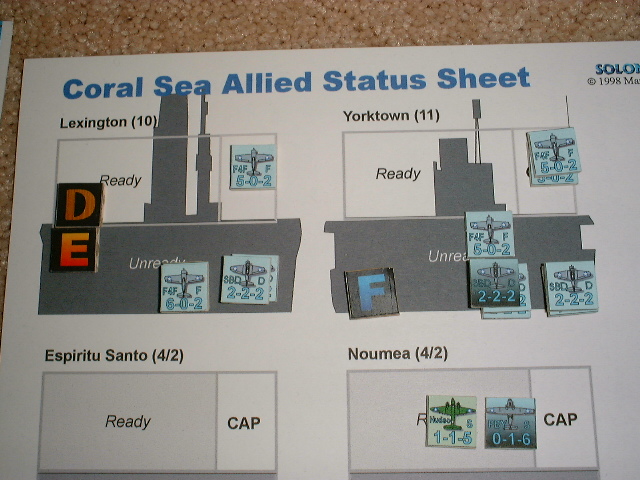
Situation at the end of 0430 turn, May 4
0800: Fletcher notes that he is in a dilemma. Moving south will bring him into the path of the Japanese submarines which can move this turn. Moving west will bring him dangerously close to the Japanese carriers. He decides to move eastwards which will keep his distance to the goal marker and allow him to slip by the subs later.
The Japanese send an additional search for Yorktown's TF 17 out from Tulagi, which is a good thing since both of their Mavis units are not getting through with any reports. However, since she's out of range from anything that could hit her they can't do much about her. One of the Hudsons from Rabaul, on the return leg, finds the Shoho TF. The moderate damage on the Lae aerodrome is repaired.
Situation at the end of 0800 turn, May 4
1130: Fletcher turns south to get past the submarine belt. The Mavises passing south of TF 17 fail to make contact. The Hudsons and B-17s that started at night are already landing.
Situation at the end of 1130 turn, May 4
On turn 5 (1500), both sides send out ship-based aircraft for search, but only the Japanese carriers are detected. No carriers are within striking range, but the Japanese now have an interesting decision to make. They cannot waffle indefinitely if the transports are to make it to Port Moresby.
Situation at the end of 1500 turn, May 4
Correspondingly, by 1800, the Japanese decide to march into battle rather than wait for the next day, and therefore try to close. The Americans cannot search again though and rather than have to attack with inferior wave contact dierolls, decide to maintain the distance so that any possible Japanese search will end up ineffective as well (since a short range search in N9 is not possible for the Japanese - in real world terms they just searched there).
Not much happens on the 2130 turn as both sides are not required to move their carriers and are content to see what the next day's searches bring.
May 5, 1942
In the first hours of the new day, the US shift their attention (i.e., their goal marker :-) westwards. The Japanese carriers look more to the east, while Shoho aims for the Jomard passage. It seems this will be the day of decision. The Allies launch two long-range searches from Noumea and Port Moresby. The Japanese only launch one group of Mavises, from Shortland, since the location of the US fleets is fairly well circumscribed. (After this point I switched to the submarines as random events rule, so they are no longer on the map.)
Situation at the end of 0100 turn, May 5
Things get interesting right away at first light (0430) as both Japanese carrier forces are discovered while the Japanese search planes suffer from communications problems (but as they're far away from anything that doesn't really matter). The US advantage cannot be capitalized on though since at the moment both sides' TFs are still out of strike range.
0800: The US carrier forces feel the urge to close wit hthe enemy, but first check their stance. Both roll higher than 5 and therefore could keep the distance. As this is a transport move turn, both sides must still move towards their goal marker. The Japanese have to move first. The US forces decide that they do have an advantage since the enemy has already been sighted and move so as to be within strike range after all. The Japanese place a short range search in their direction which finds the US ships while they themselves are not found again by the US SBDs launched from Lexington, so that their strikes will have a slight advantage in finding the enemy due to the more recent search reports. Both sides exchange airstrikes at a range of 200 miles, flying in separate waves from each carrier.
Situation at the time of exchanging strikes, May 5 (with new goal markers)
Zuikaku's and Lexington's planes do not find the enemy, but the planes from Shokaku split up to attack the Yorktown and Lexington TFs in M10. Lexington's Wildcats shoot down four Vals, but fourteen others, accompanied by nine Kates, press the attack home. A Val scores a bomb hit on Lexington. (A 1/J 10 [10/21])
Yorktown's CAP of eighteen Wildcats is outmaneuvered by the nine Zeroes of the escort, and half the Wildcats are shot down or damaged in a wild melee. The rest shoot down several Kates, leaving fourteen in the attack, together with nine Vals. The Kates attempt an anvil attack, losing another five to the resulting AA crossfire. The Vals drop their bombs in a string of near misses alongside Yorktown, but due to the anvil attack, the torpedoes cannot be outmaneuvered and one strikes Yorktown's port side. After one and a half days of maneuvering, a sudden flurry of action sees both US carriers smoking and stricken. (A 2/J 11 [12/32])
Simultaneously, the strike from Yorktown goes in to hit the Japanese TF. Unfortunately, the weak escort cannot prevent the 27 CAP Zeroes from breaking through, and an equal number of SBDs is shot from the skies before the Wildcats take revenge, shooting down a meager four Zeroes. Merely eighteen SBDs and nine TBD's remain to attack, but the unthinkable happens - while busy shredding the dive bombers, the CAP has ignored the torpedo bombers (well, I rolled too high), and a lowly Devastator manages to put a torpedo into Zuikaku. (A 11/J 3 [23/35])
The strikes return to their carriers. Lexington, with a hole in its deck, still can operate planes fast enough to take over the 36 planes that have survived their attack on the Japanese task force. Yorktown's strike, after fruitlessly searching the Japanese for hours among the clouds, is taken back on the carrier in full strength.
Zuikaku with the damage from her torpedo hit.
On the Japanese side, Zuikaku lands her 54-plane strike, and Shokaku lands the 49 remaining from hers.
As deck crews are manhandling the planes into the hangars, firefighters are trying to get the flames and smoke under control. In one case, they do not manage it. The fires on Zuikaku keep spreading and the carrier is evacuated and scuttled by destroyers (DR 2-1). Not all planes can be taken on board Shokaku and some have to be ditched. (A 16 [39/35])
The Americans bring the fires on Lexington under control and the carrier steams on, although at slow speed and unable to operate planes (DR9->7, and the F result has no effect, since she was hit by a dive bomber). Yorktown is luckier since all boilers can be brought back on line (DR4->3, an E hit is removed), although some storage compartments remain filled with seawater.
Both sides may redirect their carriers. The Japanese, hungry for revenge after the loss of Zuikaku, decide to move towards the Southwest so the two damaged US carriers cannot escape. Lexington would like to escape to Brisbane, but Yorktown will try to keep on a westwards course to be able to threaten further Japanese moves and simultaneously stay within range of land-based air from Port Moresby and Australia.
Lexington and Yorktown after the Japanese attacks
It is now almost noon (1130). Lexington is only slowly regaining speed, and the Japanese continue to close up. Shoho is joining the race southwards. The Japanese side cannot place a meaningful short range search and therefore doesn't do it. The US side has no carrier aircraft ready, and the range is too far for the Hudson from Noumea to reach the battle area and return before dark. The Mavises from Shortlands, on the northward sweep of their long cruise, find the US carriers again though, and this time the carriers are within range of the Betties from Rabaul. Although, the promised escort, fourteen Zeroes from Lae, do not make the rendezvous (missed their arrival dieroll), the twenty-odd bombers press the attack, find their targets, and split to attack the US task forces.
Thirteen attack Lexington and with DR 4, 2, 9, put a torpedo into her side. Four are shot down in the attack on Yorktown, the other five do not hit. The Lexington damage control crews work heroically, but cannot control the fires and the ship is abandoned (DR7), with 36 planes still on board. (A 1/J14 [40/49])
1500: Initiative rolls become important now, especially since all the task forces have to move towards their goal marker. The Americas have to move first, and Yorktown moves southwestwards, followed by the Japanese carrier TF. This leaves the carriers in the same hex as the remains of TF16... but TF16 is no longer a carrier force and its escort mission permits it to remain in the hex. As a result, surface combat is quite likely to ensue if the Americans manage to find the Japanese again. Both sides, with all carrier based planes ready for launch, send out short range searches.
At Rabaul, the Japanese transports have been released and start their long march south (although with certain misgivings since there is a rumor among the crews that a Japanese carrier has already been damaged or even sunk in the battle).
Shoho and all the US task forces are found. To the American's intense irritation, their searches (the search from the carrier's SBD's and the ship searches) do not find Shokaku. Her "previously sighted" status will still make her eligible for an airstrike but TF 16 will still suffer surprise when running into the Japanese carrier escorts.
Yorktown launches all her planes at Shokaku, 100 miles to the northeast, while Shokaku's planes are coming the other way and nine Kates from Shoho are reaching out to Yorktown from 200 miles to the north. Fletcher decides to send the SBDs in one wave, and the TBDs in a second one. The TBDs never find the Japanese carrier and turn back without result. The SBDs search Shokaku between the clouds and finally find her on the trip back, after having already given up on the search (DR 3, just enough). Both Shoho's strike (DR 3) and Shokaku's strike (DR 9) find Yorktown. Yorktown's CAP gets the jump on the attackers and shoots down 4 torpedo bombers and 9 dive bombers (DR 7,4,3,3) against no losses from the escorts (DR 9,10). AA fire shoots down another 4 dive bombers (DR 2,10,9,8,6,5). While the torpedo bombers have been put under so much pressure that they cannot aim adequately, the dive bombers manage to hit Yorktown. (A 4/J 10 [44/59])
A hundred miles away, in an extraordinary long shot (a DR of 8 to 10 is required for contact due to the longer search required by Shokaku's F-2 status and the maximum launch modifier), 23 SBDs and 9 F4Fs do find the Shokaku task force and are jumped by Japanese CAP, who shoot down 9 SBDs. Five more are lost to AA fire. The remaining nine attack Shokaku and score a hit! (A 10/J 3 [54/62])
Meanwhile, back at the ranch... the bombers from Port Moresby arrive to pound Lae. Since the escorts of the last turn's anti-naval strike are still on the trip home after searching in vain for the bombers they were supposed to protect, there are no good targets though. 18 Zeros on CAP are nonetheless surprised by the audacity of five P-39s diving on them; four Zeroes are downed, the others miss the fighters attacking them (DR 8,9,0), but take a measure of revenge on the bombers (6,7,9). The flak misses, but damage from the bombers' effective return fire damages another five Zeroes who crash or emergency land at Lae. The bombers nonetheless aim badly, distracted by the CAP, and achieve only minor damage (DR 3,3,0,1,0,5,7,8). (A3/J1 [57/63])
In the surface combat phase, TF 16 has a golden chance to hit Shokaku by getting past its weak escort, but being surprised by the sudden appearance of the Japanese, cannot exploit the opportunity. A textbook long range torpedo attack and gunfire sink an Allied cruiser and cripple a second one that, after a four days, manages to slip into Brisbane and will spend half a year in the dock; the rest withdraw. (J8 [57/71])
Both carriers have to land their CAP. Shokaku manages to land most of her planes, but nine Vals and the returning B5N search planes have to be diverted to Shoho. Yorktown is still effectively stopped when her strike returns and 18 TBDs and nine F4Fs have to ditch alongside the carrier. (J3 [57/74])
Shokaku DC roll: 10->8: F,D, leaving her unable to launch planes with D,E damage.
Yorktown DC roll: 7->5:F,F,D, a lucky roll that means Yorktown is likewise out of the action (E damage), but alive despite two hits.
After the second round of strikes, May 5
1800-2130: With night falling, the damaged carriers begin drawing apart.
May 6, 1942
Decision time!! Well, not for the US side, but the Japanese now have exactly their historical quandary to face. An active contribution to the air campaign against Port Moresby is pretty much impossible. Shoho alone won't be good for much more than a couple of weak strikes at surface forces (if she risks getting into the vicinity with her weak escort). So their transports will have to go in alone against land based air that, against such slowmoving ships, may manage to gain hits even with medium bombers. Do they continue, or do they abort?
Well, since this is sort of a solo playtest game, the Japanese will go for it. At 0100 Shoho sets course to the southeast to try and catch up with TF 17, and the transports keep going.
0430: At first daylight, a massive raid Rabaul strikes Port Moresby, but finds the airfield empty and only achieve limited damage. Five bombers are shot down by AA fire or damaged so heavily that they do not make it back to friendly airfields. The airplanes from Port Moresby have fled to Townsville. (A 1 [58/74])
At 0800, Yorktown's luck runs out. A Mavis from Shortland sights the carrier 200 miles off the Australian coast and the Shoho TF alters course towards it. B-17s from Rockhampton, searching for Shoho, fail to deliver any useful reports in time to be relayed to Fletcher. Shoho launches her complete remaining planeload, 9 Vals and 5 Kates, in an unescorted strike. Since the US has no long range fighters available, the Yorktown TF is unprotected. Fierce AA fire hits no aircraft, but forces them to bomb inaccurately (or perhaps Shoho doesn't have the expert aircrews on board), and Yorktown gets away with a few near misses that do no damage. Having been detected, TF 17 has a reason to change its movement goal and sets it to Townsville to get into the Australian CAP umbrella.
Shoho does not move further southwest at 1130 to avoid the prowling B-17s, knowing that she will be able to get back into range of Yorktown on the next turn after her planes are readied again. The strike at Rabaul lands.
Shoho in pursuit of Yorktown, May 6
At 1500, Shoho faces an interesting problem. The Yorktown contact is at level S-2, if she attacks without searching beforehand, at 200 miles there is only a 20% chance of finding the target again. If she uses her Val unit to search, she only has the 1-step Kate unit to attack. The Japanese decide to strike without searching, and roll a 2; the strike planes have not found anything at the limit of their range, they jettison their bombs and torpedoes and return home. Continuing on is too dangerous (getting close would bring Shoho within range of the relocated planes from Port Moresby) and the Shoho TF aborts.
1800: TF 17 reaches Townsville, releasing the surface units of the TF as escorts since Yorktown will stay in Townsville.
May 7, 1942
During the night, the Japanese transports pass through the China Strait, reaching point J11 at 0100 and Port Moresby at 0800. The Allied bombers take off from Townsville to land at Port Moresby at 0430 and are engaged in furious bomb loading at 0800. A surface bombardment by the cruisers has no serious effects on the airfields further inland. The transports start unloading, but the bombers destroy 3 steps in an air attack at 1130, with 1 bomber step lost. This means 6 points lost vs 27 gained, but Port Moresby does not fall and the Allied aircrews continue nonstop bombardments on the attacking troops and their transports. As the remaining transports raise anchor to move back towards Rabaul, a last major air attack sinks them around 1800 (6 more points to the Allied side). (A12/J27 [70/101])
The battle ends as neither side engages in further aggressive action In theory the Japanese could have tried another air raid but the results have not been that great so far. Even if both sides still had operating carriers they would have to spend the next day refueling, so no big action that way either.
Final Status
Yorktown final damage status: E (can be removed using the Coral Sea rule).
Shokaku final damage status: D, E (8 weeks repair time - DR was 4).
Analysis: The outcome is interesting insofar as the Japanese lead by points (101 to 70) - their performance in the battle was arguably superior in that they scored more hits on the enemy carriers and managed to land the majority of the troops. However, transport losses meant that New Guinea is not secure. Port Moresby is contested but with the airfields still in Allied hands, the Japanese clearly will not be able to supply their landed troops; eventually they will be overcome. And the loss of Zuikaku is a blow that will see the Japanese at a disadvantage in later battles. I left the point system intentionally untouched by the damage control outcomes so that battle performance will not be affected by the vagaries of that particular dieroll - players are rewarded for successful strikes. However, the loss or repair time variation of carriers due to the damage control dieroll has a powerful long term effect.